Tuesday, December 31, 2013

[TIPS] How do I disable the intro Valve video to Dota 2 (with step by step instructions)

1.  In Steam, go to your Library.


2.  In the Library, right-click on Dota 2 and select Properties.

3.  In the Properties window, select Set Launch Options.

4.  In the popup, type in -novid and then hit OK.


You're now all set!  This will work regardless of whether you start it directly from the library or whether you use a desktop shortcut.

Monday, December 30, 2013

[GUIDE] Steam Marines: How to Play


Welcome to Steam Marines!  As of today (Dec. 30, 2013) it's still theoretically in Alpha, but don't let that fool you.  It already has enough for a complete game experience and the addictive gameplay shines through from the beginning.

What is Steam Marines?
It's a turn based, 2D, squad-combat roguelike set in a steampunk world on a spaceship.

Now what do those terms mean?
  • "Turn based": You take your turn, then the enemy takes theirs.  No simultaneous moves.
  • "Squad combat": You control up to 4 Space Marines at any given time who are all trying to stay alive in a very terrifying ship.
  • "Roguelike": There's a lot that goes with that term, but the short answer is that there is no persistence between plays.  At any given time you have just one game going.  There are no checkpoints, and you can't intentionally save (though it does start you from where you left off if you quit).  When you lose all your squad members, that's it!  Game over!  Time to start the next game.  The heart of roguelikes is not improving by grinding better gear or stats in game, but improving as a player.  That means thinking smarter, making better decisions, and understanding the world.
  • "Steampunk": Click here for a description.  Your marines shoot guns at robots, but there are pipes everywhere with steam coming out of them...
  • "Spaceship": Flying through space, wheeeee!


Okay, how do I get it?
Their website lists multiple ways to get it, but most likely you'll end up purchasing it on Steam.


I've bought the game.  Help me get started!
Try the tutorial first!  It's not bad, but it's very short.  It'll get you started with the mechanics and controls at least though.

For your first real game, DO NOT SELECT A GRENADIER.  Grenadiers are a great class, but it's very easy to screw up on your first playthrough and blow up your squad with him.  Save him for your second game at least. I would suggest replacing him with another leader.

Now that your game has started, you should see something that looks like this:


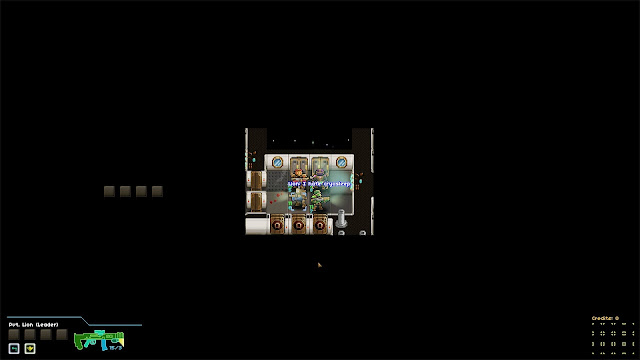
For starters, look at your surroundings to identify what things are.  Those brown rectangles to the west and south are doors, that can be opened by walking into them.  The blue circles are just windows (can't see through them however).  The rectangles directly to the north are lockers, which can be opened for credits or items by bumping into it, like so:


Your primary goal is to find the elevator on every level, get your whole squad to it, and descend to the next level.  Along the way you'll find many bloodthirsty robots, who have to be eliminated before you can proceed.  The most important thing to remember is that 1. you have all the time in the world to think and 2. the robots are usually very, very slow.  This means that you can often even kite one around in a room if you need to.

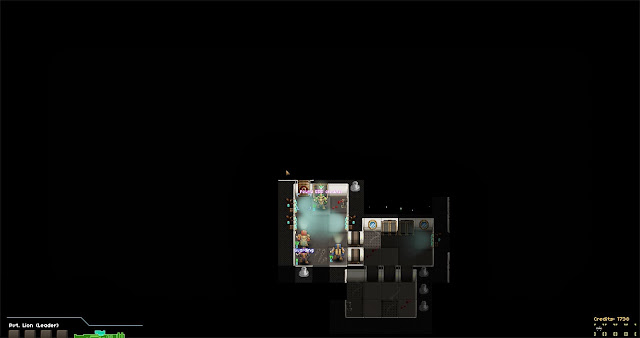
Sometimes you get really screwed over like this:

When you're in trouble, don't forget to stop to THINK!  Especially make sure to check your inventory.  Weapons like the laser sight can really save you in a pinch.

Note that doors and walls are sometimes booby trapped with a little device on top of them.  You can see two of them in the screenshot below.  Do NOT touch them as they will explode!  You can bait enemies into them of course, or preemptively explode it yourself.


When enemies are weak and alone, think about meleeing them to save ammo.  For example, you can see the Brute in the shot below has lost ten health already from my sniper.  I have a squadmate nearby who can easily finish him off in two melee hits.  Since melees never miss, I know it's nearly a risk-free move.


Another excellent time to melee:


General tips:
  • Get used to never using the mouse, except to click through menus or to hover over objects to see what they do.  Using the mouse to move or shoot will just confuse you later and you'll do something you didn't mean to.
  • Tab and Ctrl will advance you forwards and backwards through your squad.
  • Pressing the "C" key will cycle you through your laser sight (+25% accuracy) or your flashlight (+1 sight range).  By default, the flashlight is active.  It costs 1 AP to use, but this is actually really key to playing the game well.  Basically whenever you're shooting at something besides your ideal range, you want to have the laser sight on.
  • If you need to reload, remember it consumes all of your remaining AP.  Thus you might want to move to a safe place first, THEN reload.
  • If you're running low on ammo, the Smasher Stat (+1 melee damage, +10% obstacle bash chance) can really help you.
  • If an enemy is low on health, consider using melee attacks to finish them off to save ammo.
  • You can push enemies into space (for example, with the shotgun) to instantly kill them.  They must be by the black border on the edge of the level.  You'll always need to destroy at least one wall segment to be able to do so.
  • You can only heal from random events, finding healing items (like the Canteen) or over time (this will take a while).
  • Items can be used by anyone, but they can cost 1 AP to use.
  • Guard Mode shots can go diagonally, but you can normally fire only up/down/left/right.  Go figure...

Enemies:


Name Health AP Damage
Bucket 18 3 5
Brute 12 3 6
FlameJack 15 3 6 (range 2)

[TIPS] Spelunky

Improving at Spelunky, like many rogue-likes, is heavily based on learning.

Here's a rough list of things you learn as you go:
  • You can throw just about anything (including damsels!) to kill enemies.
  • Don't attack the shopkeeper- he'll be very angry and most likely kill you.
  • You can step on many enemies (Mario-style) to kill them.
  • If there is a stone block on top of a ledge, you can't grab hold of it.
  • Snakes can be in pots- always attack it with your whip from a distance, then immediately attack again if there is one.
  • Same advice for bones on the ground, which can animate into skeletons.
  • Picking up the golden skull idol will trigger a giant rolling boulder that annihilates everything in its path as it goes through the level.  An easy way to avoid it is to fire a rope preemptively, then grab the idol and jump on the rope.  As long as you are higher than 2 squares you will be fine.
  • The damsel can only take two "hits" (e.g. getting whipped) before she is knocked out for good, and unrescuable.
  • Any object you can pick up can also be whipped to send it flying, which can damage enemies.
  • Projectiles that bounce off walls can come back and injure you!
  • As an alternative to carefully placing ropes through the level when you need to bring both an idol and a damsel to the exit, you can toss some bombs to make a hole through the level and throw them both down.
  • Falling from high enough will damage you!
  • If you take too long to complete a level, a giant ghost will appear that can pass through walls.  It will also slow you down while it's active.
  • If you hold the arrow keys up or down, it will pan to show you more of the map in that direction after a brief pause.  You can use this to see how far a fall is!
  • The stone block traps are triggered by ANY moving object.  Try to toss a pebble or a pot to trigger the trap, or bait an enemy into it.  In the worst case, you can throw a bomb as well.
  • Also, those traps have a maximum range that they will trigger at.
  • You can only jump two squares high.
  • Cobwebs will stop arrows.
  • You can walk through spikes (you can just can't land on them).
  • Rescuing a damsel will restore one health for the next level.
  • Weapons (like the machete and the shotgun) have to be held at all times like other items.  This makes them challenging to keep if you also need to bring damsels or idols around.
  • You'd be surprised how much just walking (not running) improves your life expectancy.
  • Bombs explode in a two square "cross".  That means two squares left, right, up and down, but only one square diagonally (up right, up left, bottom right, bottom left).
  • When you teleport into something with the teleporter, it will injure it.
  • Throwing or whipping objects in tight quarters is dangerous as they may ricochet and hit you.
  • Thrown bombs can also be used as projectiles to hit and kill enemies.
  • Throwing the damsel, regardless of whether she hits anything, will not harm her.
  • Even ricochets of a trap arrow can harm you.
  • Even if you haven't been hurt in a level, the damsel will still give you one more health.
  • You can carry golden keys (that unlock chests) into the next level, and they'll still work!
  • There will always be a path to the exit that does not require any items.  This can be useful when you're trying to find the fastest way to it (it will be the path of least resistance/difficulty typically).
  • Ropes aren't only useful for going up- you can toss them to help you go down long falls.
  • Even your rope being shot upwards can trigger arrow traps.
  • The bloody empty altar can have the damsel placed upon it to give you a random item.
  • If you don't have the key for a locked chest yet, remember you can pick up the chest and bring it with you!  You can't bring the chest with you to the next level though (unlike keys).
  • You can pick and throw an opened chest.
  • A giant spider landing on spikes will instantly kill it.

General strategy:

  • The #1 goal is survival and progression.  You will get plenty of treasure as you go, no need to take crazy risks or consume a lot of resources to just get more gold or gems.
  • The damsel should take precedence over any other side objectives you may have.  However, if it's too expensive or dangerous to save her, then you should ignore her and move on.
  • Use bombs to skip areas that look scary (i.e. you will likely take damage moving through it).


Items:
Name Description Cost
Spike Shoes Can kill enemies by jumping on them 4000
Spectacles Allows you to see items in walls 3000
Spring Shoes Allow you to jump one square higher (for a total of 3)
Pitcher's Mitt Improves your catching and throwing skills. 4000
Climbing Gloves Allows you to grab onto and climb any wall.  Extremely useful. 8000
Cape Allows you to float in the air. 12000
Parachute Deploys automatically if you would take falling damage.  One time use. 1000


Also, in case this game wasn't difficult enough, check out these videos:

Sunday, December 29, 2013

[TIPS] Endless Space Miscellaneous Tips

Some random tips:
  • Note that in the ship design screen, under "Support Modules" you can scroll down to see additional types of modules.  This is how you add engines, repair modules, colonization modules, etc.  This is most likely to be relevant when you have access to Advanced Containers which gives you an additional 25 tons of space but you need to actually select it as a module (it adds a 40 industry cost to the ship).
  • Trade Routes will form automatically, but you must be at peace with the faction.
  • Once you have researched Atmospheric Filtration it will give you access to the Empire-wide improvement "Warp Drives".  Your ships can now travel off of the cosmic strings (roads) between systems.  To do so, ctrl-right click the destination.  Note that you can't interrupt the travel, just like normal movement.  Also realize that travel along cosmic strings is still a LOT faster, so only save this for scenarios where you are avoiding a blockade or going along strings would require a much longer path.  Even then, make sure you move as close as possible to the target system using strings before engaging the warp drive.
  • You can move around your admirals (heroes in fleets) instantly (though they need to wait eight turns until they can move again).  They can even participate in two battles in a single turn.  Start a battle with the admiral's current fleet, then swap him to another fleet and fight the second battle.
  • Split your fleet apart in multiple fleets if there are several annoying little fleets in a system.  This bypasses the "one battle per turn" limit for your fleet.
  • Wormholes use all of the remaining fleet's movement, no matter how much is left.
  • Creating a new colony ship (missionary, seed ship, whatever) removes one population from your system.  Try to do it on systems that have a maxed out population already.
  • Any food that you see in a colony is a surplus.  If your population is maxed out, you might want to consider changing your exploitations.
  • Upgrading your colony ships with the first engine you discover adds an incredibly small cost (about +3.5%) in exchange for increasing their movement substantially.
  • Pirates can spawn in any non-colonized star system.  You generally don't want uncolonized systems behind your front lines after the early game if you can help it, because the pirates are surprisingly strong and can wreck havoc on your supply lines, unassembled fleets, or even capture colonies.
  • For engines, blue arrows indicate movement along cosmic strings ("roads" between star systems) while green movement indicates warp travel (movement off of the strings).  Thus an engine that gave you +6 green and +3 blue movement means that it allows you to move six parsecs further while warping and three further on strings.
  • Note that engines in this game often speed up the entire fleet, which can help considerably for a large empire.  It's useful to have a single support ship with an engine upgrade that speeds up your larger combat ships.
  • Also, it's useful in general to have a support ship with sensors, engines and a repair module.
  • Have open trade routes on planets that aren't used?  Make sure you've explored as many peaceful planets as you can.  There's a cap of one trade route to one planet, so if you have ten open trade routes you need to have explored ten opposing faction planets that you can trade with.

Saturday, December 28, 2013

[TIPS] Endless Space Weapons and Defense Explanation

Combat in Endless Space doesn't give you a whole lot of information.  Stuff that you find online is sometimes outdated or wrong.  I'll try to provide general advice that will help you to build ships and win more battles against a surprisingly tough AI (and human opponents too!).

I'm sure everyone who has come here has already seen the wiki link here, but you should probably skim it first to understand some of my advice.

All advice is current as of December 28, 2013 for vanilla only.

Quick overview of concepts:
  • Battle is composed of five "phases": Arrival, Long Range, Medium Range, Melee (Close Range), and Report.  Weapons are only fired in phases #2-4, so that's all I'll be discussing.
  • Each phase has four "rounds" of combat.  In each round, kinetics and beam weapons fire once.  Missile weapons are fired on the second round of each phase and impact on the fourth round of the phase.  Thus, the missiles fired in LR#2 will actually hit on LR#4.
  • Weapons fire simultaneously each round.


What weapons should I be building?
  • At the very beginning, you only have access to kinetics, so obviously go with those.  However very soon you can branch out into missile or beam paths.
  • Remember that missiles are most accurate at long range, beams at medium range, and kinetics at short range.  However, beam weapons are the clear winner when averaged across all ranges (e.g. they are the best "overall" weapon), followed by missiles.  Kinetics are ineffective until you reach close range, at which point they become devastating.
  • Missiles are devastating long range weapons, but dramatically lose effectiveness as you get closer.  Against opponents without missile defenses and only kinetics (most of the early game), missiles are clearly the best weapons.  You can destroy entire fleets with first strikes and take barely any damage.
  • Note that missiles have a "flight" time.  They fire on the second cycle of the phase and arrive on the fourth.  That means that a critically wounded ship that requires only one shot to kill it will get to fire for two extra cycles before your missiles destroy it, which wouldn't happen if you were using beam or kinetics.  However, this also guarantees that your missiles will be fired off even if your ships are destroyed immediately after, since they fire their whole payload at the start of the phase.
  • Final note on missiles: since they all hit the same target in a phase, they're not very good against many smaller ships (a lot of damage is lost as "overkill").
  • Beam weapons are best at medium range, but are good overall as well.  They're great for reliable damage output, and they should be your "default" weapon choice if you don't have a more specific plan.
  • Kinetics are the riskiest of the weapon choices.  It is not uncommon to run into a battle and lose a kinetics fleet with barely any damage dealt (e.g. kinetics efficiency < 10%).  The most likely reason is that your ships are getting destroyed before they can get close enough to be accurate (kinetics have a mere 20% accuracy at long range).  However, at close range they can be devastating against an opponent who has insufficient protection, combined with the lower accuracy of other weapon types up close.  The trick is surviving until you can get close enough.

What's the general theory of defense?
  • Note that fleet defenses are summed together when used for calculations.  For example, you can have one ship devoted just to deflection (vs. kinetics), one to shields (vs. beams) and one to flak (vs. missiles) and it'd be just as strong as the three ships with the defenses split among them.  However, note that if one of the ships dies earlier in the combat it opens a huge hole in your defenses, so I wouldn't suggest that plan.
  • Generally, lean towards building weapon modules over defense modules.  Defense modules are useless if you "guess" wrong (e.g. you build ships with flak defense, but the enemy shows up with missiles), while weapons will always work at full effectiveness.
  • The flip side is that if your enemy is heavily specialized (this can happen if one of their weapon techs jumps ahead of the others) you can build a counter fleet very quickly that can almost completely negate their damage.
  • More simply:
    • Balanced offense > Specialized defense > specialized weapons > balanced defense = balanced offense
    • There's a lot more to combat than that (particularly the ranges of the weapons) but it's a good general rule of thumb.

What defense modules should I be building?
  • First, an intro on defense mechanics:
    • Flak defenses have a chance to shoot down up to three missiles per phase.  If interception is  > evasion, a missile is destroyed.  At all tiers, flak interception > missile evasion.
    • Shields absorb a flat amount of beam damage per round. If you deal 100 beam damage and they have 50 shields, you deal 50 damage (excluding accuracy or critical hit factors). For perspective, the first beam weapon does 15 damage and the first shields absorb 15.  The final beam weapon does 200 and the final shields absorb 200.
    • Deflectors absorb a certain number of projectiles per round.  Kinetic weapons are interesting- their per projectile damage increase is minimal (2.5 damage/shot at the earliest tech up to 7 at the end) but they dramatically increase the number of projectiles.  Tier 1 weapons fire only 4 shots per salvo, but the final tier fires 42.  For perspective T1 defense stops 2 projectiles and T10 stops 39.
  • As a general rule for effectiveness: flak defense > shields > deflectors
  • Or put another way: ratio of defense modules needed to absorb ~100% of enemy weapons of the same tier:
    • Flak defense to missiles- 3:1
    • Shields to beams- 1:1
    • Deflectors to kinetics- 1.25:1
  • Flak defense is the strongest in the game for its corresponding weapon type.  A relatively small number of flak defenses can destroy a significantly larger (up to 3x) missile amount. However, the defense is an all-or-nothing deal.  Either your flak will shoot down the missiles or they won't (potentially modified by battle cards).  If the enemy fires 50 missiles (evasion 10) at you and you have 10 flak defenses (interception 13), you will shoot down 30 missiles.  However, if they shoot 50 missiles (evasion 20) at you, you will intercept zero missiles.
    • What this means is that as long as your flak defense tier is >= enemy missile tier, you should expect to shoot down 3x as many missiles as you have defenses.
    • Flak that is higher than their missile tier is somewhat "wasted" since it won't be more effective, but it gives you more buffer in case of modifiers or if they upgrade when you aren't ready.
    • It also means that if you are using missiles yourself, you should either aim to use MANY lower tier missiles, or get a higher tier of missiles than your opponent.
  • Shield defense is straightforward.  It's a flat damage reduction per round, Of note is that if the enemy lacks the ability to exceed your shields in a given round, you will take no damage.  It also works well against lower tier weapons, but not disproportionately so.
  • Deflectors are the toughest shields.  Superficially, they seem similar to shield defense.  They negate a certain number of projectiles per round.  However, the two key differences are: 
    • At the same tier, deflectors are worse than kinetic weapons
    • # of projectiles fired scale up very quickly with tiers
  • This means that deflectors are decent against the same kinetic weapon tier, but terrible against higher tiers (but not as bad as missiles) because there are so many more projectiles that are totally ignored.
  • Note that the converse is also true.  Higher tier deflectors are very effective against multiple lower tier kinetics.

Here's a chart to help summarize the defense concepts:

Defense Type vs. Higher weapon tier vs. Same weapon tier vs. Lower weapon tier
Flak TerribleOutstandingGreat
Shields Good Good Good
Deflectors PoorOkay Good


Thursday, December 26, 2013

[TIPS] Max Payne 3 Tips

MP3 is actually pretty difficult on hard (though sometimes it feels like you die when you had no way out of it).

Some random advice:

  • Always aim for the head.  This is like the single most important advice.  Almost all enemies die in a single shot to the (exposed) head.  Helmeted enemies require the helmet to be shot off, which typically takes one shot except for certain mini-bosses.
  • Firing calmly gets you a lot further than spraying and praying.  Why fire 20 SMG bullets to kill someone when one to the head would do?  It also allows you to kill more guys before reloading.
  • SMGs, especially dual Uzis, are excellent in the early game, but totally useless later on due to the armor and helmets that most enemies wear.
  • Laser sight arguably makes it harder to aim with the weapon in some situations, like at long range.
  • Note that there is recoil in the game even though it doesn't show your white dot crosshair moving (unless you are using a laser sight).
  • Bullets, even outside of Bullet Time, have travel time.  That means if an enemy is running across your field of view and a good distance away, you might actually need to lead them a little bit.  Typically the front "half" of their head will still be a headshot no matter what.
  • Use Bullet Time liberally.  Don't use it when you're going to die- use it to prevent damage.  That tip will significantly reduce the number of restarts you need to do as you'll get further on each life.
  • You can preemptively stop Bullet Time by hitting the "shift" key (or whatever you have it bound to).  This will help save some of your charge.
  • Speaking of Bullet Time, note that you only dodge bullets if you are moving.  That means activating Bullet Time and staying still might help your aim but still exposes you to same amount of damage.  Try to stay moving if they're shooting at you.
  • Many fights, especially at the start, have a "puzzle solving" element to them as you figure out what is the "best" order to kill the enemies in.  There's some randomization there (enemies might stay in cover, for example) but you'll find the best way to pass a fight you're stuck on is to kill the enemies who are most able to do damage to you, in order.
  • When you're low on health and worried about dying, stay in "aim mode" (hold down right click) and inch your way slowly around corners, pausing to listen for any audio clues that enemies are alive and coming.  If they are, just wait for them to pass into your view and shoot them.

[TIPS] Max Payne 3 defeating the armored machine gunner guy in the crane scene (on top of the collapsing hotel)

This one is tricky.  If you're on hard difficulty or higher, you'll probably find it nearly impossible to beat without at least one painkiller.  Note that if you keep dying, the game will give you one, and then two painkillers on restart.

The key thing is to just aim for his head.  However, you want something with serious power.  Generally the rifles you have on the level aren't strong enough.  If you have a revolver and a pistol, dual wield them and just fire at his head calmly.  Once his helmet pops off one more headshot will kill him.

In fact, a general tip for defeating the armored machine gunners is to dual wield pistols.  I have no idea if they actually have higher damage per second than automatic weapons or if there's some kind of penetration stat, but dual wielding pistols will usually take off their helmets in very few shots.

Wednesday, December 25, 2013

Does the Dungeon of the Endless Founder pack coupon stack with other sales for Endless Space?

If you buy Dungeon of the Endless on Steam, it gives you a coupon of 50% off on the developer's already released game, Endless Space.

The coupon will automatically be used when you add Endless Space to your shopping cart.

It ALSO stacks with any other sales that might be going on for Endless Space (for example, the 2013 Winter Sale).

Proof below:


Atlas of Worlds Strategy (Path of Exile Heist League 5.12)

 Despite reading the wiki and other good resources, I still found the POE atlas/map dropping to be extremely confusing. I've written a s...